BRAZILISH FOOD is the pleasure of my life translated in my favourite recipes, from UK (the home I chose), Brazil (my home) or from any other place that the food makes me feel at home.
BRAZILISH FOOD é o prazer da minha vida traduzido em minhas receitas favoritas, do Reino Unido (a casa que eu escolhi), Brasil (minha casa) ou de qualquer outro lugar em que a comida faz com que eu me sinta em casa.
There are many different recipes for pancakes and, obviously, my favourite is my mum's one!
As I've said before on the "Food and I" post, my mum is a chef and one of the best I've ever known, and her recipes always work for me! Even though sometimes I adapt them to my taste.
The pancake recipe can be used for sweet and savoury fillings. Here is the ingredients list:
250g of plain flour 100g of corn flour 2 cups of milk 2 eggs 1/2 tsp of salt A pinch of baking powder Butter - to grease the frying pan
Beat all the ingredients in a blender and leave it to rest for, at least, 30 minutes, meanwhile it is a good idea to prepare the fillings and sauces you want to have with your pancake.
Here I've done chicken, spinach and mozzarella filling with bechamel sauce for main course as well as nutella and double cream for desert. But I would also recommend a ham, cheese, tomato (all finely chopped) with oregano filling and tomato sauce. Delicious!!!
I am posting the video of how I cook the pancakes, but if you're not as confident with flipping them in the air, just do it with the help of a fork.
I am not "listing" the fillings ingredients, as I believe you will do as you like, but I will describe what I've done anyway...
For the filling: Fry 2 chicken breast chopped in 1 tbsp of butter and 1 of olive oil. Mixture 1 tsp of garlic paste and fry until the chicken pieces are golden brown. Add one medium onion finely chopped and fry all until onion goes soft. Turn the heat off and add about 100g of spinach and 1 ball of mozzarella, both chopped.
For my bechamel sauce: Fry 1 finely chopped onion in 2/3 tbsp of butter and 1/2 of olive oil. Add a clove, a pinch of nutmeg and a full tbsp of garlic paste and fry until golden. Add 3 cups of milk and in another cup of milk dissolve 1 and 1/2 tbsp of corn flour. Season to taste. Remove the clove, blend the sauce and sieve it, if you prefer your bechamel nice and soft (I don't mind the texture of the onion, but if you're doing for other people I would recommend you to do so).
Fill the pancakes with your mixture.
Fold the sides.
And place them in a baking tray.
Cover with cheddar cheese.
Put the bechamel over the pancakes and sprinkle Parmesan cheese and some black pepper.
Bake in a preheated oven on 180 degrees Celsius for about 20 minutes.
Serve hot. The picture below does not look so appetising but I can guarantee it was delicious!
For the desert one I spread 2 tsp of nutella on the pancake, folded and served with a tbsp of double cream (could have been ice cream if I have had any on my freezer)! Yummy!
I love butternut squash, pumpkin, and all this winter squashes that you can eat only with a spoon. The sweet and nutty flavours always go well with cheese and if roasted, I can't even tell!!!
Well, so get the ingredients ready and try some:
1 medium butternut squash 1 full ramekin of courgette 1 ramekin of yellow pepper cut in squares 1 ramekin of chopped shallots 1 ramekin of chopped leek 1 ramekin of cherry tomatoes cut in halves 1 ramekin (one ball) of sliced mozzarella 20g of flaked almonds A sprinkle of chili flakes (or powder) 4 tbsp of olive oil 1 tsp of balsamic vinegar 1 tsp of turmeric 1/2 tsp of garlic paste 1 tbsp of Parmesan cheese 1 tbsp of bread crumbs Salt and pepper to taste
Heat the oven to 200 degrees Celsius. Half the butternut squash and scoop out the seeds with a spoon. Cut the flesh of the squash in criss-cross as in the picture.
Mix in a cup 2 spoons of the olive oil, all the balsamic vinegar, turmeric and garlic paste, and brush the mixture over the squash. Put them in a tray, covered with tin foil and place it in the oven. Meanwhile, prepare the filling in another baking tray adding the courgettes, shallots and yellow pepper, a sprinkle of chili, salt and pepper to taste and the other 2 spoons of olive oil mixing them together and also placing them in the oven for 15 minutes.
When the 15 minutes have passed, uncover the squash halves and set the timer for another 10 minutes. After these 10 minutes, add to the filling the tomatoes, leeks and almonds and set the timer again for another 12 minutes.
Take everything from the oven, place the filling on the top of the squash halves, the mozzarella and sprinkle with some Parmesan and bread crumbs. And bake for another 10 minutes or until the bread crumbs are golden.
It is delicious with a rocket salad seasoned only with balsamic vinegar, olive oil and salt. And also really good company for a pinot noir glass...
Hope you enjoy!!!
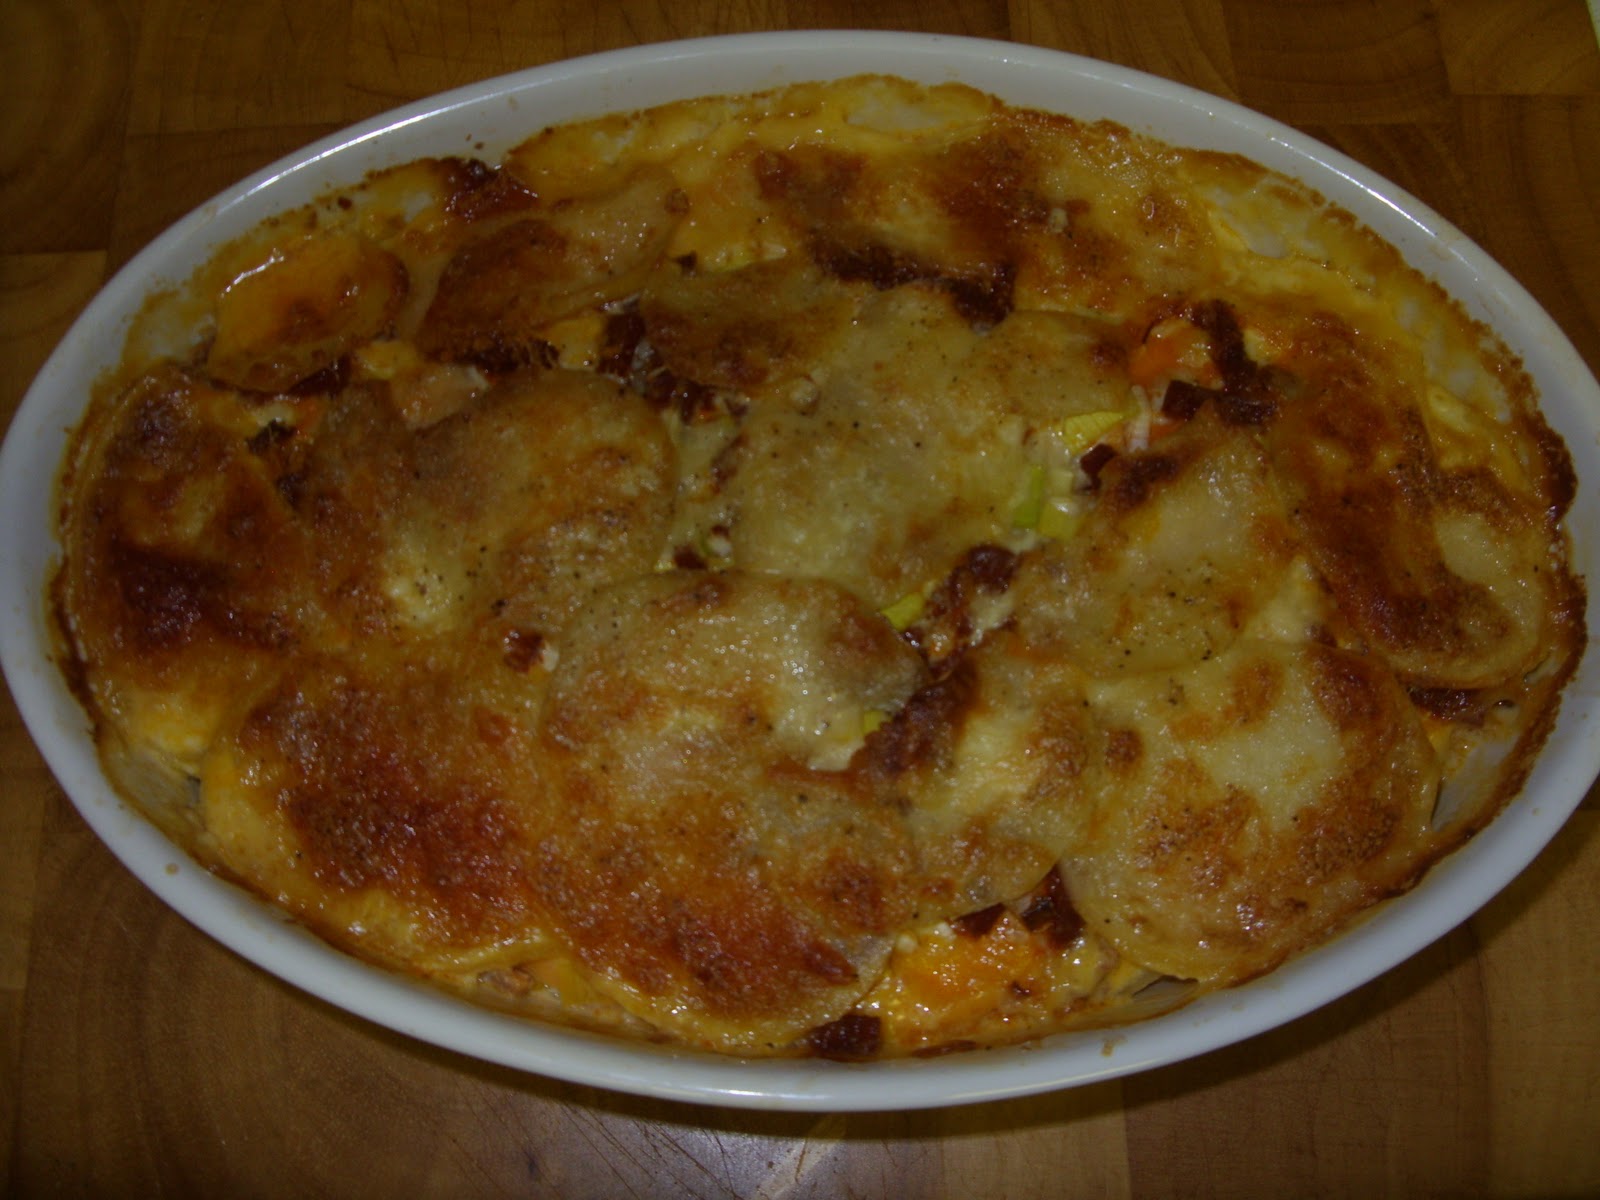
For this cold days, there's nothing better than prepare the food, sit in the sofa waiting the oven to cook the prepared food for you. This is the kind of dish you can prepare in advance and leave it in the fridge until the time you fancy it (but don't leave it in the fridge for a day, if you need, bake it first, leave it to cool and pop it in the fridge, so you can it bits warmed in the microwave).
This gratin, or pie, or whatever you want to call it, is very easy to do and delicious to eat.
You will need:
1 big potato - or 2 if you don't want to use sweet potato 1 sweet potato 250g chopped chorizo - Spanish sausage 200g of leek 200ml of double cream Salt, pepper and garlic paste to taste Parmesan cheese to sprinkle on the top
Heat the oven to 200 degrees Celsius (180 fan/gas 6). Slice the potatoes (regular and sweet) in thin disks. Grease the bottom of an ovenproof dish with butter (and garlic paste) and place some of the potatoes disks to cover the bottom of the dish.
Season with very little salt and pepper (consider that the chorizo is salty and will release its juices) and layer with chorizo and leek.
Repeat the process of layering over again (potatoes, seasoning, chorizo and leek).
The last layer has to be of potato.
Sprinkle the Parmesan on the top and pour the double cream over the pie, making sure it enters the little holes to spread over all the layers of the gratin/pie.
Cover the dish with kitchen foil and put it in the middle shelf of the oven to cook for 30 minutes covered and 20 more minutes after you take the kitchen foil cover off.
The result will look something like this:
And if you like it as my husband and I do, after 40 minutes you might have a dish like this (which I finished next day):
Delicious with a white wine (pinot grigio or sauvignon blanc)!!! Hummmmmmmmm!
I know I've been a little bit off, but I have reasons to it. I've been searching for jobs as well as researching for new recipes. I have found some stuff that might be worthy doing, but I thought I should give a go on my easy home made little things such as meat balls (which I use the same recipe for my burgers) and people here love them!
When the kids are around I fill the meat balls or burgers with cheddar cheese and they adore them!
It is also suitable to freeze and I leave there for a month or so and will work just as good.
So, to the recipe:
800g of mince meat 1/2 a medium onion finely chopped 1 egg 1 tsp of smoked paprika 1 tsp of dried oregano 1 tsp of ground coriander seeds A pinch of ground nutmeg A pinch of finely chopped chives and parsley - I normally cut a big bunch and freeze them Salt and pepper to taste - for this amount of meat I used 2 tsp of salt And plain flour if needed
Start mixing all the ingredients and knead it as if it was a bread dough. If the mixture is too wet, add a spoon of plain flour and knead it again until well combined. You have to be able to make a little meat ball and it won't crumble.
This recipe I've made to freeze and not waste my meat, so I cooked some to show the end result and I also took a picture of how I freeze them. So there you go:
To cook, heat a frying pan with a tbsp of olive oil and put as much or as little meat balls you would like (for burger, use less olive oil). Fry the ball on each side, moving them around from time to time to seal for about 3 minutes, put the heat down and cook a little bit more if you like it medium rare to well cooked. If you fancy any sauce, this is the point to add it.
To freeze I separate the layers with cling film. Hope you like it!
Researching about English fishes to decide which one I should use to take on Jon's challenge and make this recipe, I found the website http://www.wildengland.com that is an A to Z compendium of England's native wildlife targeting children, and I've learned that:
The Cod is one of our best-known offshore native fish. It is commonly associated with our traditional 'fish and chips'
So I have chosen cod to cook my moqueca, but it is a flaky fish. If I could suggest (and I guess I can), use monkfish as it is meatier fish with a dense firm texture and sweet flavour (often compared to lobster) and won't "melt" on the sauce. In Brazil we would use "Pintado" especially (it seems that the equivalent is the fish cherne) . And by the way, don't research about monkfish, its picture will put you off!!!!
OK, let's go for the recipe:
1 cod fillet - it would be a good idea to ask your fishmonger to take off the bones and skin 1/2 tbsp of olive oil 1/2 green pepper sliced 1/2 orange pepper sliced - you can use the yellow or red ones 2 tomatoes sliced 1/2 onion 1/2 chili pepper Zest of 1/2 a lemon Bunch of coriander Bunch of parsley (flat leaf) 1 tsp of garlic paste 4 tbsp of "azeite de dende" (palm oil) - found in Brazilian or African shops in UK Pinch of coriander seed grinded 1/2 of a tin of coconut milk Salt and pepper to your taste
Cut the fillet in about 5 pieces and season with a little bit of salt and pepper. In a mixer blend the onion, chili, lemon zest, coriander, parsley, garlic paste and coriander seed until well combined.
If you have a shallow casserole you will need to preheat the oven to 180 degrees Celsius, if not the cooking process can easily be done on the stove.
In a shallow casserole (as you can see I don't have one, so I used a frying pan) put the olive oil, heat it and put the fish to fry a little. Add all the sliced peppers and tomatoes, pour the blended mixture over it and the palm oil.
Leave it to fry a little bit, about 3 minutes and add the coconut milk. Put it in the oven to cook for about 15 to 20 minutes, if your doing it in a frying pan, put a lid on and leave it to cook on a moderate heat for the same time described for the oven. When it is ready the sauce will have thickened and will look as below:
Then it is ready to serve. I love it with white rice (as it is Brazilian main side dish), but you can have it with some potatoes (mashed, cooked, anyway).
I really love it and after I have been to some Indian restaurants it reminds a bit of Korma, but still different, at least for me. Hope you enjoy it, Jon!
Having tried food from everywhere I can and picking influences of every cuisine, I make things my way, but using these influences!
For my pork I used the inspiration of my mum serving pineapple with pork (influence from Brazil), English Sunday Roast (pork roast) and Japanese restaurants in Brazil serving shitake mushroom with pineapple in a parcel.
I thought that roasting a pork with my spices and adding these 2 other ingredients (pineapple and mushroom) would bring nice flavours for MY Sunday Roast!
What to use and how to do:
500 gr of pork loin 150 gr of pineapple cut in cubes 150 gr of mushroom - I used oyster as well as button mushrooms 1/2 of a large onion 1 tsp full of garlic paste 1 glass of white wine - about 500 ml 6 tbsp of soy sauce 1/2 tsp of smoked paprika 1/4 tsp of mixed spices 1 tbsp of honey or golden syrup 1 tbsp of butter A pinch of grated ginger Salt and pepper to taste A piece of a chili - it will really depend on your preference for the size of the piece and for the type of chili you will use here
Preheat the oven to 200 degrees Celsius (180 fan).
Season the pork with a little bit of salt and pepper on all its sides and seal it on a frying pan until golden brown. Score the pork to better absorb the sauce. The pork will release some of its fat. Put the pork in an ovenproof dish, reserve the frying pan with the pork fat to cook the mushrooms and pineapple.
In a mixer put the onion, garlic, half of the glass of white wine, 3 spoons of the soy sauce, all the paprika, mixed spices, grated ginger and the chili (if you decide to use it) and blend it until well mixed. Pour 2/3 of this mixture over the pork, cover well with a tin foil and put it in the oven to cook.
In the same frying pan that you sealed the pork, with the fat released, add a spoon of butter and fry the mushrooms until golden brown. Add the pineapple, cook it with the mushroom for about 3 minutes and add the rest of the wine, soy sauce, golden syrup (or honey) and the 1/3 of the onion mixture left.
Cook a little to reduce the juices, about 5 minutes.
Take the pork from the oven, turn the pork, pour the mushroom and pineapple sauce over it, cover back and back in the oven for 15 minutes until you turn it again and uncover it to finish cooking for another 15 to 20 minutes.
If you have a left over of rice in your fridge, I recommend to serve it with some almonds fried in butter as a side dish for the pork. I used the equivalent of: 4 servings of pre-prepared white rice 2 tbsp full of flaked almonds 1 tbsp of butter
Melt the butter in a frying pan, add the almonds and fry it until golden brown. Add the rice and serve with the pork.
It is totally worth it and might bring some compliments of who tries... My husband said it was the best pork he's ever eaten!!!
Well, I am calling it "not really" because it did not taste like the round-the-corner Chinese satay sauce (which is great, even coming from a take away - and yes, sometimes I go for a take away). But having said that, the taste was still beautiful!!! - Modest, me??? ;-)))
And as always, it will be up to you to try it, improve it and comment...
For my satay sauce I used: 2 tbsp of smooth peanut butter - I would rather have used the crunchy one 1 tbsp of soy sauce 1 tbsp of honey 1 tbsp of balsamic vinegar 1 tsp of garlic paste 1 tsp of sesame oil 1/2 tsp of mixed spices 1/2 tsp of turmeric 1/3 tsp of grated ginger 1/2 a red chilli - to your taste, I like it mild Juice of 1 lemon 1 small onion - I forgot this ingredient on my one, but I bet it will taste just as great if not better.
Put all the ingredients together in a mixer and it'll be ready!
For my chicken: 2 chicken breasts - cleaned and sliced in strips 1/2 tsp of garlic paste 1/2 tsp of salt 1 spoon of olive oil Black pepper to taste
Grill the strips for about 2 minutes each side, put the heat down, grill each side for another 3 minutes, heat up again to finish it and give it some colour.
Put the chicken in a bowl and mix with the sauce - you can serve it separately if you prefer - and it is ready to serve. With white rice and some salad was just delicious!
My white rice recipe: 2 1/2 tbsp of vegetable oil 2 ramekins of basmati rice 1 tsp very full of garlic paste Salt to taste About 750 ml to a litre of water
Fry the garlic paste in the oil, when well fried (refer to picture below) add the rice.
When the rice gets opaque, add the water about 5 cm above the rice line, season to taste (try the water to check if it has enough salt for you), put the lid on the pan, heat down and leave it for about 20 minutes. Again, do not mix the rice at all until it is ready. Everyone in UK that have tried my rice loves it, so, give it a go!
* Jon (my ex English teacher) has challenged me to cook the Brazilian Moqueca with English fish. So, NEXT PLANNED RECIPE: English Fish Brazilian Moqueca
One of my mum's Sunday dishes was the arroz com cabelo de anjo (rice with "angels hair" - how we call vermicelli at home). I love this rice and my brother has perfected it! I am not sure if this is a lebanese or egyptian recipe, but I know its origins lie in the middle-east.
I never attempted to cook it and I need to register here I'm not used to mesuring things when I am cooking, so, this blog is a real challenge, a good one though!
To reproduce this recipe I had to imagine the mesures of each ingredient, which I will describe here and comment on it.
I used a ramekin to mesure, as cups here have different sizes to Brazilian ones.
For this recipe I used:
2 ramekins of basmati rice 1 ramekin of vermicelli (pasta that looks like spaghetti, but thinner) - I think I should have used more of it, so, when you cook it, make it 2 1/2 ramekin of finelly chopped onion 1 table spoon (tbsp) of turmerik 1/2 tbsp of garlic paste - I normally make my own crushing garlic with salt (it last for a month, so I make loads on the mixer) 1 tbsp of butter - I use only salted butter 2 tbsp of vegetable oil 1.25 litres of boiling water Salt and pepper to your taste - I put 1 tea spoon of salt and half of pepper
Firstly fry the vermicelli in the butter. When the pasta is golden add the onion.
As the onion releases water wait it until it dries back and add turmerik, fry it a little bit with everything else and add the garlic paste. When the garlic paste dries, add the oil and the rice.
Fry the rice a little until the grains are whiter. Pour the whole boiling water, season to taste and leave it to cook. From now, on a low heat for 15 to 20 minutes with a lid.
And remember: do not mix the rice from the time you seasoned it until it is ready. Let it cook by itself, otherwise it will become mushy.
Hope you enjoy it!